Showing posts with label Superior threads. Show all posts

Saturday, May 25, 2019

Make it Modern in May on Memorial Day Weekend....


...Island Batik assignment for May was to make a modern quilt...the quilt must incorporate one of the characteristics of modern quilts as defined by the Modern Quilt Guild--the use of bold colors and prints, high contrast and graphic areas of solid color, improvisational piecing, minimalism, expansive negative space and alternate grid work. Hobbs batting is our sponor for the month!!


I must admit that this project was on the back burner of my mind this month due to farming and the excitement of going to Spring Quilt Market along with the getting ready to go!!


Do you ever have an idea come to you as you are falling asleep--and then more ideas come in your dreams?? Well that is where this one came from!! I had a crazy idea to make some kind of set of rays using Half Square Triangles (HST). Since I have all the AccuQuilt Qubes, how fun would it be to make each flying geese unit from the largest HST in each Qube. After doing some figuring--using the Qubes, I could made from 6" to 1" HST!! Don't forget to check your Corners Qubes for HST too!! That is where I found the 1" HST.


Such pretty pieces all cut and ready to sew...


...all sewn and ready for pressing. A little trick when making flying geese from HST is to press half of your units to the white and the other half to the colored. That way the seams will nest perfectly when piecing the units together.


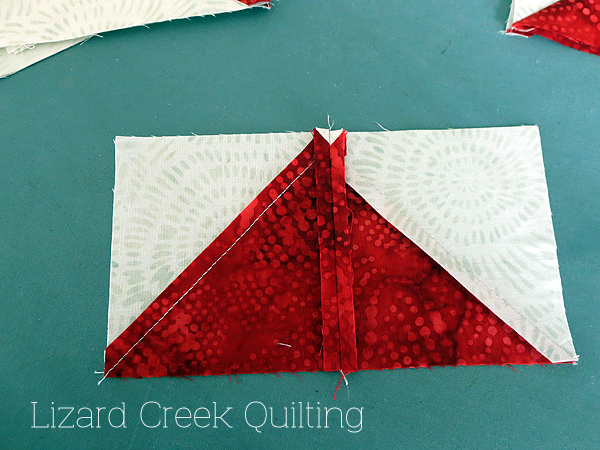
As you can see in this photo.


Loving the bold contrast of colors here.


The rays are all complete. Now to ponder their arrangement.


Loaded the quilt on the longarm and decided to do some free flowing ribbons coming off some of the ray points. I know this might not be the most modern take on quilting here--but it is what the quilt told me it wanted!! And when the quilts speak to me, I must listen!! Hobbs 80/20 batting provides such great loft and definition to the quilting.


Honor--definition as a verb--to hold in honor or high respect.
Service--definition as a noun--an act of helpful activity, help, aid.


My father-in-law was drafted into the Army during the Korean War. Serving his country is something that he is very proud of.


Small town love!!!


The cemetary for our town is just 1/2 mile from our home. The VFW puts flags on the head stones.


This tall standing head stone of a WW1 veteran is so weathered that the name is no longer visible. But the act of service to our country will never be forgotten!!


These fallen heroes represent the character of a nation who has a long history of patriotism and honor - and a nation who has fought many battles to keep our country free from threats of terror. 
--Michael N. Castle

Tuesday, December 19, 2017

Frosty Times Four...December Assignment


Frosty Times Four is my answer to the Table Scraps assignment for the Island Batik Ambassadors
this month. Find this quick and easy pattern on my Crafty account here.


These deep saturated colors of Mountain's Majesty were provided to me by Island Batik. Aren't they
just soooo pretty together.
Since the assignment was scrappy--I decided to make each block in the runner a different color. This worked out very easy by choosing 2 strips from each of 4 colors in the strip pack.


I am sure you have heard of chain piecing---but how about chain cutting??? I stacked my strips on the cutting mat. Then with only 4 passes with the rotary--all 64 pieces were cut out--Chain Cutting!! Works great!!


Then for some chain piecing!!!


I just love a good fabric closeup, don't you?!?
And how about that awesome cloud reflection on my sewing table insert?!?! Just love the majesty of the Lord!!!


Then there is the reality of those pretty closeup photos. Stacks of fabric needing to be turned into quilts, quilts hanging over the long arm frame needing to be quilted, piles of papers needing to be written into patterns!!! The real snapshot of my life!


And the occasional needing to unsew a seam or two!!!


487 Superior Threads So Fine! was just the right color for quilting. I quilted it with a free hand allover windy swirl. Just a nice generic background design.


All ready for Christmas!!


Our cute little 4 year old evergreen trees don't provide much wind protection yet--but they sure are great photo props!!


We don't have any snow yet--that is supposed to be coming on Thursday!! Thanks again to Island Batik for this great assignment. If you want to make this quick and easy Frosty Times Four table runner for yourself--get the pattern here on Craftsy!!


Thursday, July 6, 2017

Island Ways are Winding...

Can you believe it is summer already!! I have been super busy sewing--but none of the projects can be shown yet!! Super excited about all the new adventures I am trying!!

The Ambassador theme for June was to use curves. Great opportunity again to try something new.

Earlier in June I went with a friend to Country Traditions in Fremont, Nebraska for a 4 day sewing retreat using the AccuQuilt cutting system. The teacher for the event was Edyta Sitar of Laundry Basket Quilts. We used her Serendipity Qube to learn many new things.

There were 90 ladies at the retreat and yet Edyta tried to make it to see that we all were learning and having fun. I used some fun brights from my stash to make one block from each thing she taught and turned it into a collage type wall sampler. Can't wait to quilt this one.

While at the retreat we had access to the whole AccuQuilt library. I took this opportunity to--cut the letters for my sampler--and to use the Winding Ways die for my June assignment.

First, I used half strips from the strip stack to make some strip sets. I didn't do any math with this project--just sewed and cut. After pressing the seams open, I fan folded only three layers on the die--because you have to count the seam allowances as part of the 6 layers of fabric allowed in one cut.

How pretty is this!!! I just kept on sewing strip sets and cutting out pieces until my stacks looked big enough. Then I did the same with the blend yellow.

Once I returned home, it took a bit of figuring as I didn't have any instructions...


I found that sewing the pieces like the picture shows made for the easiest assembly.


It looks wrong...but it works!!


The die cut notches are just the best thing ever!! Also, there is a little bit of bias stretch to help around the curves.


Next up, how to quilt?? In all my years, I have never atttempted these continuous circles with the walking foot on my domestic machine. Well let me tell you---that is just too much fun!! Just start in the center and go. I really like how the quilting turned out. 


This color thread from Superior was the perfect match. I wanted the yellow fabric and thread to be pushed into the background on this project, so that the eye would be drawn to the multi colored sections. I think that was accomplished.


I don't have a plan for the finished project yet--so am just going to leave it unbound for now until more inspiration strikes.


Thanks again to Island Batik for these gorgeous fabrics to be inspired by!!!!


Sunday, April 23, 2017

Bloom Maker


Bloom.
Maker.
A play on words of the fabric collections used in my April assignment--Adventurous Applique--for Island Batik Ambassadors. Blushing Blooms has a gorgeous range of colors in the red-pink-purple ending with orange range. I also used them in Happy Soul last month. Maker is a cool graphic fabric collection from Art Gallery Fabrics--this one is from my personal stash and not supplied by Island Batik. But I so wanted to use it here as the colors were perfect and I wanted to show that mixing contemporary print fabrics with gorgeous batiks can bring about an amazing finished product!!


I started out by sewing 2 1/2" squares together for the petal shapes. I know you are going to ask--Terri--why did you cut apart fabric and sew that same fabric back together??? Well, I didn't want the background to look like just a big plain piece of fabric.


Can you see the slight variations of color in the 2" squares on the right. This happens because the weave of the fabric is turned in different directions when those same colored squares were sewn back together. I know it is just slightly different--and it might not be super noticeable--but it gives just the right amount of color change and visible texture with the seams to give the project life.


Who doesn't love a closeup!!!


Petals all ready to go!!


If you were paying close attention, You would have noticed that I had the table runner all loaded up on my longarm--ready to quilt--but the petals were nowhere to be seen. That is because I wanted to try a new technique--aka too much in a hurry to put fusible web on petals before cutting them out!!!
Elmer's glue stick to the rescue. After gluing the petals in place, I planned the quilting path to include appliqueing them down while quilting. By doing this I never had to break thread--which is a long arm quilter's dream.


The circles were added as my intersections were a bit too messy for my liking--but a happy addition to the finished product!!


 The new growth of spring blooms are starting to appear here in NW Iowa, so I couldn't resist some photographs of them with Bloom Maker.


To end with--here is a quote from Elise de Wolfe...

I'm going to make everything around me beautiful, that will be my life!!!