Showing posts with label maker. Show all posts

Monday, December 30, 2019

3D Blowing in the wind..with Island Batik...


Here we are....the 30th of December-2019..what a whirlwind of activites this past year has been!!! And I have enjoyed every minute of being an Island Batik Ambassador during that time...but have decided to let the experience go so that I can make time for other new and exciting things to come!!

But let's leave that for another time...and move on to my last monthly challenge--make something 3D with Island Batik fabrics!!


The weather is cold and frightful with a strong north wind today--so the thought of taking photos outside--just went out the window--as I took this photo out my studio window!!


My concept for this  3D design challenge started long ago when I was at Spring Market in Kansas City.  I was browsing in The Fat Quarter Gypsy's booth and fell in love with their Windsock Pop-Ups. She offered me a pattern in return for mention in the blog post. You have to go check out her designs--they are amazing.


The pattern comes in booklet form with step by step photographs that were easy to follow. Some of the steps may seem a little tricky--but just follow the pattern--and it will work perfectly!! Finally cutting the spring loose was my favorite step!!


I started with strips leftover from Electric Desert by Jackie Kunkel for Island Batik. See what else I made with these gorgeous fabrics HERE.


As  you can see by comparing above photo with pattern cover, I don't always follow directions well!! I chose to put a traditonal sawtooth star in the pop-up portion of my windsock. I used the 6" Qube from AccuQuilt to cut out the star pieces.


Sooooo pretty--I can't wait to hang it out on my patio next summer!!


I chose the enclosed seams option for the tails--and by using a different fabric on the back--such a wonderful riot of color I should get when it blows in the wind. And yes, I did actually lay on the floor to get this shot!!!


I just had to figure out a way to get a blowing in the wind photo....so here the windsock is...hanging in my open studio door!!! It took a few shots to get this lovely swirl of tails, but oh so worth the cold!! Good thing nobody drove by on the road and saw this crazy quilting lady taking photos in an open doorway with her pj's on!! But now you know the behind the scenes!!


So it is....I close the door on this time as an Island Batik Ambassador. But have no fear, I still have plenty of batik fabrics and ideas left!! Plus, I still plan on designing patterns with their amazing fabrics!! Thank you to Island Batik for this AMAZING opportunity--I am forever grateful!! To the other sponsors--Aurifil, AccuQuilt and Hobbs Batting--thank you!! And to The Fat Quarter Gypsy for this super cute project!!!

Life is full of beauty. Notice it. Notice the bumble bee, the small child, and the smiling faces. Smell the rain, and feel the wind. Live your life to the fullest potential, and fight for your dreams.
Ashley Smith

"The wind blows where it wishes and you hear the sound of it, but do not know where it comes from and where it is going; so is everyone who is born of the Spirit."  John 3 : 8


Friday, April 26, 2019

Island Batik Giggles.....


As part of the Island Batik Ambassador program this year, the Ambassadors were sent an AccuQuilt Ready, Set, GO! package--a super deal if you are looking to get started with this cutting system--it includes a GO! cutter, 8" Mix & Match Qube, 2 1/2" Strip Cutter die and mat along with getting started instructions!! Pull it out of the box and start a new quilting adventure!! The assignment this month is to make a baby quilt featuring the sponsor AccuQuilt.


Since I do a bit of freelance trade sample designing with AccuQuilt, I was given the option to choose any other product as a replacement to the Ready, Set, GO!. You can read about that in my unboxing post HERE.


Let's get started. The first thing I do when getting new dies, is to draw lines 1/4" away from the blade on all sides of the shape. I have seen some use a specific silver sharpie marker for this step--I just use whichever one I pull out of the can first.


It should look like this when finished.


These marked lines will now give me boundries when placeing the fabric over the blades on the die board. On the AccuQuilt site you can find a Fabric Reference Chart HERE that will tell you the size of strip to cut for every die the company has. I highly recommend this reference!!!


Such a happy assortment of colors!!!! I also used the Grey solid from the Foundations line. LOVE this fabric!! Nice tight weave with virtually no fraying with cutting!!


When die cutting applique shapes, it is helpful to place the fusible to the wrong side of the fabric strips before die cutting the shape.


Then is it important to place the fabric on the die board correctly!! Ask me how I know this?!? Place fabric right side down over just the letters needed--remember that the fusible count as a layer--so 3 rectangles per letter max!


All the pieces ready to GO!--lickety split!!


Loaded the quilt top on the long arm....added the 80/20 batting provided to me by Hobbs....


...threaded the long arm with 40wt Aurifil #6724--Moonshine--provided by Aurifil in a previous Ambassador box....


....and quilted lots of happy little loops!! I call this design--One Way Loops--as I try not to change the direction of the loop.


I like to secure applique shapes with what I call--Snapliquilt--because it is a Snap to applique and quilt at the same time!! As I am quilting the background, I will just sneak onto a letter, quilt a squiggly line around the shape 2 or 3 times and then sneak back off the applique and continue quilting the background. Super fast and easy!! Don't you just love the definition of the stitiches with the 40wt Aurifil!!


And such great definition from the batting!! A quilter's dream--to see the pretty stitches!!


And here it is...Giggles with Island Batik!!


Thank you to Island Batik, AccuQuilt, Aurifil and Hobbs for provided the products to make this quilt!!
It will soon be in the mail to a dear friend of the family who just added another little girl to their family!


Tuesday, March 26, 2019

Vintage Reimagined.....Island Batik Ambassdor Assignment....


....Vintage Reimagined...."Take something from the past and give it a personal touch that is yours. Inspiration can come from anywhere!" A quote from our assignment the month of March.


My Mom gave me this scrapbook that was found in my paternal Grandmother's things after she passed away. Inside are Kansas City Star newspaper clippings that my paternal Great Grandmother cut out and pasted in the book. Every page has 2 clippings. The page edges are getting brittle, but the binding is still intact. The scrap book lives on a book shelf in my long arm studio. How cool is that--it now lives in a studio with a quilting machine that wasn't even invented when these clippings where so lovingly cut out and saved.

To my knowledge my Grandmother did not quilt---but she could do amazing mending on Grandpa's bib overalls!!! I also don't know of any surviving quilts from my Great Grandmother. I don't even know where my Great Grandmother lived---oh if I didn't have a quilting addiction I would so enjoy doing geneology!!


The clipping dated February 10, 1937 from the scrapbook caught my eye for this month's challenge. Here is what The Kansas City Star says about The Nosegays, "This is an excellent design to try when you desire to make use of odds and ends in your scrap bag. All diamonds and squares may be made of prints. The pattern was contributed by Mrs. Anna A. Threlkeld, Waynesville, Mo." Copywrite 1937.  There are no further instructions than what you see here. The templates do not include a seam allowance--I read that on another clipping. So I guess you just dive in and do it!!


I can say that this Nosegay block has always intriqued me. So much so, that when I designed 72 blocks for the AccuQuilt Angles Qubes in 2017 I had to include an easier but similar looking block. 
The block is called Splendor. 
Squares, half square triangles, kite shape and side triangles all cut with the 10" AccuQuilt Mix & Match Qube and Angles Qube.


Here is an Electric Quilt drawing of the two blocks side by side. The same, but different. Simplified.


A tip when pressing the kite shapes. I like to first set the seam by pressing the unit before opening the seam. Finger press the seam open. Then I lay the unit straight horizontally on the pressing mat so the iron can just simply set down on the seam to press open. 


Long wavy quilting lines seem to be my go-to lately!!


Aurifil Light Orchid #2515 was the perfect blend of pinky purple color!!


The snow has all melted!! Can't wait for the world to start greening up again!!!


“Give of your splendor to everyone.
Like the sun.” 
― Emmanuelle Soni-Dessaigne

Thank you to Island Batik for the fabrics, Aurifil for the piecing and quilting threads, and Hobbs for the batting in this project.


Monday, July 2, 2018

Petal Perch....June assignment


Island Batik's Ambassador assignment for June--Modern Style and larger than 36" x 36". It should include open negative space, high contrast fabrics and strong graphic appeal.


Now, those requirements are quite far to the left of what I usually design!! But I do love a challenge!!

I started with inspiration from a traditional pattern of mine--Mixed Bouquet--you can find that pattern here on Craftsy.


Using the Orange Peel die #55455 from AccuQuilt. I cut out several petals from the Plum Delicious line by Island Batik. These are leftover fabrics from the Mixed Bouquet quilt.

I really did not have a plan at all when I started this morning!! I cut out the petals and had some left over backing strips of Heather--Eclectic Garden--then just started sewing.  And then some ripping--until a plan started to present itself!!


After trying 3 different colors for the "perches" I finally came to the perfect choice.

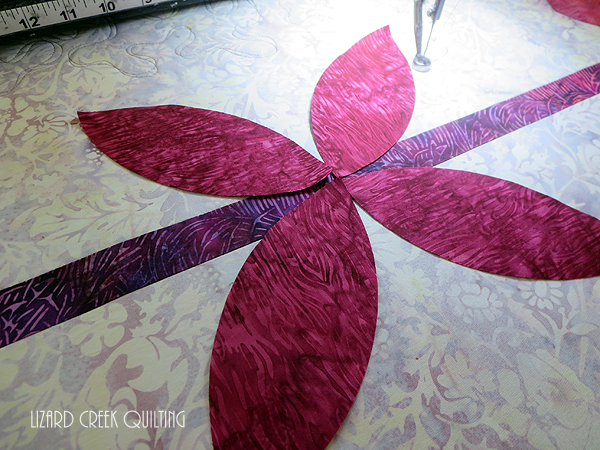
I used a Frixon pen and the 45 degree line on an acrylic ruler to make an X for petal placement.

I also peeled apart some scraps of Steam A Seam Lite 2 and placed them on the X.


Violla!! Perfectly easy placement for the petals!! I choose not to cover the backs of the petals with fusible web to keep the applique shapes soft and flexible as this quilt might end up to be a baby gift.


Loaded up the little quilt on the longarm and went to quilting. Since I am thinking it will be a baby gift for a sweet little girl I decided to go with ribbon meander freehand quilting. And then when I came to the petals I could sneek right in and do a double line of doodle stitching to applique and quilt at the same time!! Win for the time column!!


Strong south winds are never good for taking outdoor photos when living on a hill.....


 ...and trying to take photos by myself---there were several failed attempts!!!


 So lay on the grass it is for this photo shoot!!!


 Petal Perch!! Strong graphic appeal!! Super cute and super fast!!


 Thank you to Island Batik for supplying the fabrics for this project and to Aurifil for the thread!!